Hoppa till innehåll

Etikett: Howto

How To: MSI DigiVox mini II V.3 – Ubuntu

UPDATE: The scrips has been updated and now uses Zentity for the last notify.
UPDATE 2: Now there is also a setup added for the remote controll. Thanks to Holger!
UPDATE 3: Works in Ubuntu Gutsy to Lucid.

I recently got each of my sisters and myself a DVB-T-card to watch some TV on our laptops whereever we are. Here is how easy that is to get going.

Download this script, make it executable (chmod +x) and run it in a terminal.

I recommend  Me-TV for use with DVB cards.


Jag skaffade nyligen varstitt DVB-T-kort till mina systrar och mig själv för att ha på resan eller hemma. Så här lätt får man igång detta kort.

Ladda ner detta skript, gör den körbar (chmod +x) och kör den igenom en terminal.

Jag rekomenderar Me-TV för användning med ditt DVB-kort. (Vilket jag även varit med och översatt så klaga på mig ifall det skulle vara något.)


$ wget http://owncloud.danielholm.se/public.php?service=files&token=cc2adcb05a0c7eb8f9fe747f6c03180f7c5a846a&file=/Projekt/Script/digi-vox-mini-3
$ chmod +x msi.digivox.mini_.II_.V.3-v3.run
$ ./msi.digivox.mini_.II_.V.3-v3.run

Install MeTV

Jaunty, Lucid and so on:
$ sudo add-apt-repository ppa:me-tv-development/ppa
$ sudo apt-get update && sudo apt-get install me-tv

Edit /etc/apt/source.list and add these three lines:

Intrepid Ibex
#Me-TV
deb http://ppa.launchpad.net/lamothe/ubuntu intrepid main
deb-src http://ppa.launchpad.net/lamothe/ubuntu intrepid main

Hardy Heron
#Me-TV
deb http://ppa.launchpad.net/lamothe/ubuntu hardy main
deb-src http://ppa.launchpad.net/lamothe/ubuntu hardy main

Gutsy Gibbon
#Me-TV
deb http://ppa.launchpad.net/lamothe/ubuntu gutsy main
deb-src http://ppa.launchpad.net/lamothe/ubuntu gutsy main

$ sudo apt-get update && sudo apt-get install me-tv


Link to Linux-TV Wiki:
http://www.linuxtv.org/wiki/index.php/MSI_DigiVox_mini_II_V3.0
6 kommentarer

Ubuntu + GPS using Nokia N95(8GB) and Bluetooth.

The other day when I was going to a meeting downtown I started thinking about that it had to be possible to use my mobilephone (Nokia N95 8GB), which has GPS, together with my laptop, so I perhaps could get some better maps and primary a bigger display.

I started Googleing and soon enough, I got it working. This is how to use your Nokia N95 as an GPS device for your Ubuntu computer over Bluetooth:

  1. First of all, you need to download ExtGPS to your phone and install it. ExtGPS is free for personal, non-commercial use.
  2. After installation start ExtGPS. When started you will be prompted with two questions. Yes to both of them,.

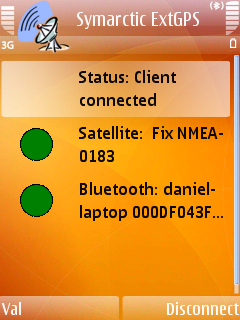
    ExtGPS display

  3. Wait untill you get a sattelite connection – which may take a while. During the search, make sure that your phone is visiable and that you can connect to it from your computer. When the red sattelite icon turns green, you are good to go.
  4. Now Open a Terminal in Ubuntu and run this command;
    $ sdptool search SP

    You should se something like this:
    Service Name: Symarctic ExtGPS
    Service Description: Share phone’s built-in GPS module via Bluetooth
    Service Provider: Symarctic Solutions
    Service RecHandle: 0x10015
    Service Class ID List:
    ”Serial Port” (0x1101)
    Protocol Descriptor List:
    ”L2CAP” (0x0100)
    ”RFCOMM” (0x0003)
    Channel: 5
    Language Base Attr List:
    code_ISO639: 0x656e
    encoding:    0x6a
    base_offset: 0x100

    It was the ”channel 5” we wanted.

  5. Now we need to edit the rfcomm.conf. Run:
    $ sudo nano /etc/bluetooth/rfcomm.conf

    Now in this file, go to the bottom and paste this:

    rfcomm5 {
    bind yes;
    device XX:XX:XX:XX:XX:XX;
    channel 5;
    comment ”GPS Device”;
    }

    Replace XX:XX:XX:XX:XX:XX with your phones hardware-adress:
    $ hcitool scan

    Save the file and exit.

  6. Now we first of all need to restart the Bluetooth service:
    $ sudo /etc/init.d/bluetooth restart
  7. It’s time to install all the necessary packages in Ubuntu:
    $ sudo apt-get install gpsd

    After that, download and install tangoGPS;
    $ wget http://www.tangogps.org/downloads/tangogps_0.9.3_i386.deb && sudo dpkg -i tangogps_0.9.3_i386.deb

  8. Now, with ExtGPS running, Bluetooth and all the needed packages installed, we are ready to test. Begin with starting gpsd to talk with your phone and recive signals via Bluetooth, using this command only:
    $ sudo /usr/sbin/gpsd -N /dev/rfcomm5
    The ”-N” starts gpsd as a non-daemon. If you’re okay with it running in the background you may remove the ”-N”.
  9. Now start tangoGPS (you also got xgps together with gpsd, but its ugly and tangoGPS isn’t) and you should see your location and the map.
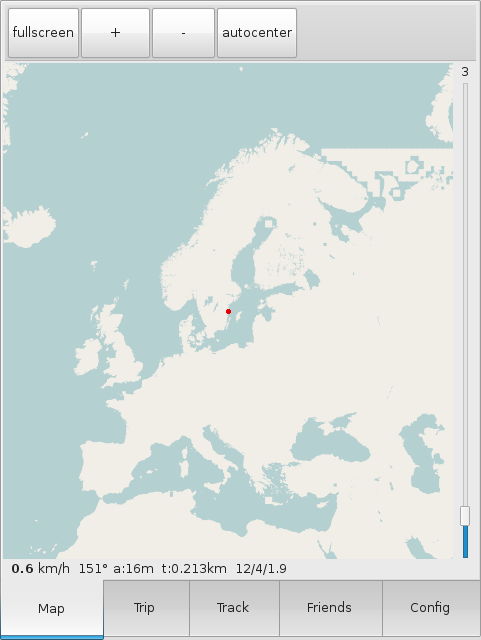
    tangoGPS in action
    tangoGPS in action!

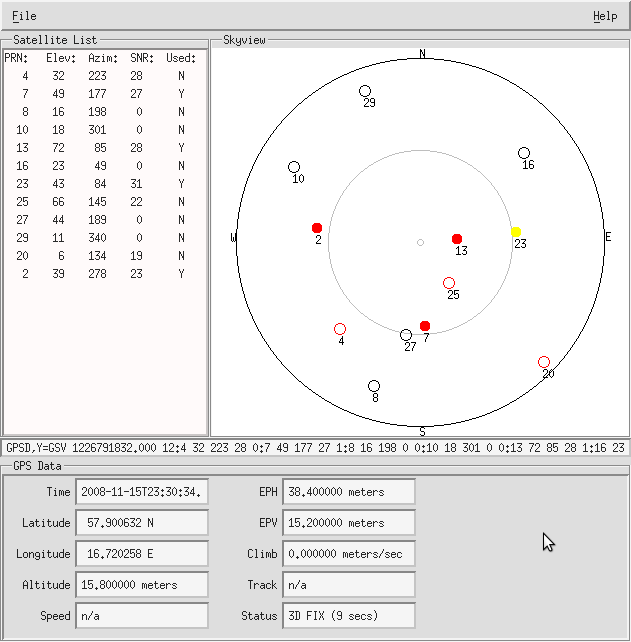
    xgps in action
    xpgs in action.

  10. Done!

tangoGPS has much more features then xgps, which doesnt seem to be anything more then a test software. It also seems that you can watch different sattelites with it.
But tangoGPS has features as being able to set up a trip from A to B and track things a lots of other fun stuff.
Enjoy!

Reference:
http://www.simplehelp.net/2008/10/22/how-to-share-the-gps-in-your-n95-with-your-laptop-via-bluetooth-in-linux/
http://www.linux.com/feature/152468

1 kommentar